
Sometimes, I find myself craving that perfect blend of salty, sweet, and creamy—like a peanut butter cup but in tart form. It’s a kind of dessert that feels like a warm hug from the inside, especially when made with good quality chocolate and peanut butter.
This particular recipe is my go-to when I want to impress but keep it simple. The process is forgiving, and the result is honestly addictive. Plus, it’s one of those desserts that tastes even better after a day in the fridge, the flavors melding in a cozy, chewy way.
focusing on the nostalgic comfort of childhood treats with a grown-up, rich twist
Why I Keep Coming Back to This Recipe
- I love how this tart combines childhood nostalgia with adult flavors.
- Baking it always makes my kitchen smell like a cozy chocolate shop.
- Sharing this dessert feels like giving a little piece of happiness.
- It’s imperfect, sometimes messy, but always delicious—like life, really.
A little personal story about this tart
- This tart was born out of a craving for something rich yet comforting, that I could make without fuss. I wanted layers—crunch, creaminess, and that luscious chocolate top—that come together in a messy, satisfying way.
- It’s a recipe I tweak every time, sometimes adding a pinch of sea salt or a splash of bourbon to the peanut butter for depth.
- It’s my go-to for gatherings, a dessert that’s easy to assemble and always disappears fast.
The story behind the chocolate peanut butter tart
The peanut butter and chocolate combo became iconic thanks to early 20th-century advertising, especially in America.
Graham crackers originated as a health food in the 1800s, and their fine crumb is perfect for tart crusts.
Chocolate ganache, the glossy top layer, has been used in desserts since the 19th century, thanks to French pastry chefs.
This tart is an adaptation of a classic ‘peanut butter pie’ that’s been loved in Southern homes for generations.
Ingredient insights and tweaks
- Graham cracker crumbs: I love their sweet, toasty flavor, but digestive biscuits make a nice swap, adding a slightly different sweetness.
- Peanut butter: Creamy varieties melt smoothly, but crunchy adds texture—try both to see which you prefer.
- Chocolate chips: Use semi-sweet for balance, but dark chocolate gives a richer, more intense flavor.
- Butter: Salted butter adds a subtle saltiness that enhances the layers—unsalted works fine but consider adding a pinch of salt.
- Powdered sugar: It dissolves smoothly into the peanut butter, creating a silky layer—regular sugar can be used but may be grainier.
Spotlight on key ingredients
Graham crackers: Their sweet, toasty flavor and fine crumb make the perfect crust base.
- Peanut butter: It’s gooey, salty, and rich—look for natural varieties with just peanuts and salt for the best flavor.
- Chocolate: Glossy, smooth, and melting to a velvety finish—quality matters for that perfect shine and depth.
Chocolate chips: They melt into a luscious ganache, giving a shiny, crackly top that’s irresistible.
- Butter: Creates a tender crust and glossy finish—use real butter for richness and flavor.
- Powdered sugar: Dissolves quickly into peanut butter, giving it a silky texture and sweet note.
Substitutions for a flexible recipe
- Dairy-Free: Swap butter for coconut oil or vegan butter—flavor stays rich, but the crust might be slightly more delicate.
- Gluten-Free: Use gluten-free graham crackers or crushed digestive biscuits—still sweet and nutty.
- Vegan: Use dairy-free chocolate and plant-based butter—maintains richness with a plant-based twist.
- Extra Nutty: Add chopped peanuts or toasted hazelnuts for crunch and flavor.
- Reduced Sugar: Use dark chocolate and less powdered sugar—less sweet but still satisfying.
Step-by-step guide to making the perfect Chocolate Peanut Butter Tart
Equipment & Tools
- Mixing bowls: To combine ingredients smoothly.
- 9-inch tart pan: To shape and bake the crust.
- Double boiler or microwave-safe bowl: To melt chocolate gently.
- Spatula or offset spatula: To spread layers evenly.
- Hot water or heat source: To melt chocolate without burning.
Step 1: Preheat your oven to 175°C (350°F). Mix crushed graham crackers, sugar, and melted butter in a bowl.
Step 2: Press the crust mixture into a 9-inch tart pan, making sure to press firmly and evenly. Chill for 15 minutes.
Step 3: Bake the crust for 10 minutes until golden and fragrant. Let it cool completely.
Step 4: Melt chocolate and butter in a heatproof bowl over a double boiler or in short bursts in the microwave, stirring until smooth.
Step 5: Pour the melted chocolate over the cooled crust, spreading evenly. Chill for 20 minutes.
Step 6: In the meantime, beat peanut butter, powdered sugar, and vanilla until smooth. Spread this layer over the chocolate.
Step 7: Refrigerate the whole tart for at least 2 hours, or until firm.
Step 8: Just before serving, melt a handful of chocolate chips and drizzle over the top for a glossy finish.
Step 9: Slice with a hot knife, wiping clean between cuts, and serve chilled or slightly at room temperature.
Let the tart rest in the fridge for at least 2 hours, allowing flavors to meld and layers to set. Serve chilled, and if desired, garnish with chopped peanuts or a drizzle of extra chocolate.
How to Know It’s Done
- Crust is golden and firm.
- Chocolate layer is glossy and set.
- Peanut butter layer is smooth and slightly firm.
Tips & tricks for a flawless tart
Use good quality chocolate—melts better and tastes richer.
Chill layers thoroughly to prevent mixing and keep textures distinct.
Press crust firmly into pan for even baking and to prevent crumbling.
Use a hot knife when slicing to get clean, neat pieces.
Don’t skip refrigerating after each layer—sets the layers perfectly.
Common mistakes and how to fix them
- FORGOT TO CHILL THE CRUST? Pop it back in the fridge for 15 minutes to firm up.
- DUMPED THE CHOCOLATE? Reheat gently and add a splash of cream to loosen.
- OVER-TORCHED THE CHOCOLATE? Stir in a teaspoon of hot milk to smooth out the scorch.
- CRACKED THE TOP? Re-melt some chocolate and smooth over the cracks to hide them.
Quick fixes for common issues
When chocolate is too thick, add a splash of warm cream to loosen.
Splash hot water on the knife before slicing for cleaner cuts.
Patch cracks with melted chocolate or a quick swipe of peanut butter.
Shield the tart from humidity to prevent the chocolate from blooming.
When in doubt, refrigerate longer—firmness makes slicing easier.
Make-ahead and storage tips for this tart
Crust can be made a day ahead; keep it in an airtight container at room temperature.
Assemble the tart a day in advance; keep refrigerated, covered tightly.
Chocolate topping is best added just before serving to stay glossy.
Tart freezes well for up to a month—wrap tightly and thaw in fridge before serving.
Why this tart matters to me
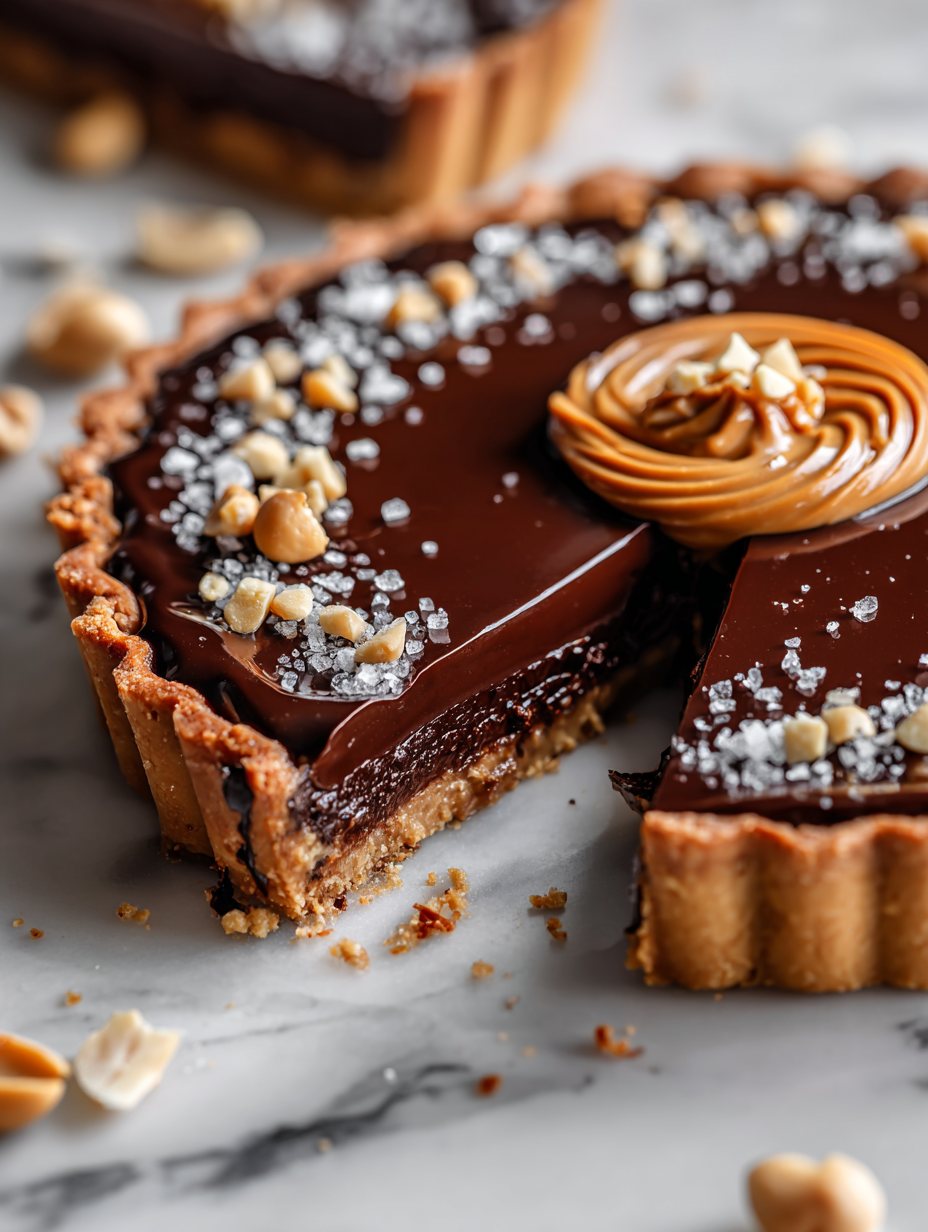
What makes this tart different from others? It’s got a thick, gooey peanut butter layer that’s rich and slightly salty, balancing the sweet chocolate. You get this creamy, melt-in-your-mouth texture with every bite.
Can I use natural peanut butter? Yes, but it might be runnier. Consider refrigerating it first or adding a touch more powdered sugar to firm it up.
Is there a way to make it dairy-free? Absolutely. Use coconut oil or vegan butter for the crust and dairy-free chocolate chips for the topping.
How do I prevent the crust from cracking? Press it firmly into the pan, and don’t skip chilling it before filling. Chill again after baking.
Can I make this ahead? Yes, assemble the tart the day before, refrigerate, and add the chocolate topping just before serving.
What’s a good substitute for graham cracker crumbs? Digestive biscuits or crushed pretzels work well, adding a different flavor profile.
How do I know when the tart is done? The crust should be golden and firm, the chocolate glossy and set, and the peanut butter layer slightly jiggly.
Can I freeze the tart? Yes, wrap it well, freeze for up to a month. Thaw in the fridge before serving.
What’s the best way to cut it? Use a hot knife, dipped in hot water, to get clean, smooth slices.
Any tips for serving? Serve slightly chilled or at room temperature for the best texture and flavor.
Chocolate Peanut Butter Tart
Ingredients
Equipment
Method
- Mix the graham cracker crumbs, sugar, and melted butter in a bowl until the mixture resembles wet sand and holds together when pressed.
- Press this crumb mixture firmly into the bottom and up the sides of a 9-inch tart pan, creating an even crust. Chill in the fridge for 15 minutes to set.
- Bake the crust in a preheated oven at 175°C (350°F) for 10 minutes until fragrant and slightly golden. Remove and let cool completely.
- Meanwhile, melt the chocolate chips and butter together in a double boiler or microwave in short bursts, stirring until smooth and glossy. This creates your luscious ganache layer.
- Pour the melted chocolate over the cooled crust, spreading it evenly with a spatula. Chill for about 20 minutes until set and shiny.
- In a separate bowl, beat the peanut butter, powdered sugar, and vanilla together until smooth and creamy. Spread this layer gently over the hardened chocolate ganache.
- Refrigerate the entire tart for at least 2 hours or until firm. This allows the flavors to meld beautifully.
- Just before serving, melt a small handful of chocolate chips and drizzle over the top for an extra glossy finish. Garnish with chopped nuts or a drizzle of chocolate if desired.
- Slice the tart with a hot knife, wiping it clean between cuts for neat pieces. Serve chilled or at room temperature for the best experience.
Notes
Whenever I make this, I remember sitting at my grandma’s kitchen table, licking the spoon with sticky fingers. It’s a reminder that sometimes, the simplest ingredients come together to create something that feels like a small celebration. That’s what keeps me coming back to this recipe.

Founded by Rachel Morgan, a proud home cook and foodie from Austin, Texas, this blog is all about transforming everyday meals into moments of joy.