
Sometimes, I crave something hearty but not hot. This chickpea Buddha bowl hits that spot, especially when the air’s still brisk but the sun’s warming up.
I love how it’s all about textures—crisp greens, tender grains, crunchy chickpeas—and how easily I can switch ingredients based on what’s in the fridge.
It’s a meal that feels like a little meditative project, layering flavors and colors, making me pause and enjoy the process.
The unexpected comfort of a cold, layered meal during a chilly spring day.
Why I keep coming back to this bowl in my kitchen
- I love how adaptable this is—every ingredient can be swapped based on what I have.
- It’s become my go-to when I want something quick yet satisfying.
- Cooking the chickpeas to crispy perfection always gives me a tiny thrill of accomplishment.
- The vibrant colors make me happy, and I swear, it’s a plate that invites you to eat slowly.
- Sharing this bowl with friends feels like sharing a little piece of my kitchen’s heart.
My inspiration behind the Chickpea Buddha Bowl
- This dish grew out of my need for a nourishing, no-fuss lunch that I could prepare in advance. I wanted something that felt fresh, vibrant, and packed with flavor, even on the busiest days.
- The idea of layering textures and flavors started as a way to make a simple meal feel special, almost like a little edible art. It’s become a favorite for its flexibility and honest ingredients.
- I often tweak the toppings depending on what’s seasonal or what I’m craving—sometimes a handful of toasted nuts, other times a drizzle of honey.
A little background on the Buddha bowl
The Buddha bowl concept originated in California health circles in the early 2010s, emphasizing balance and mindfulness.
Chickpeas have been a staple since ancient times, dating back to the Middle East, symbolizing sustenance and community.
Layering flavors—sweet, smoky, tangy—is a modern take inspired by traditional Mediterranean and Middle Eastern cuisines.
The term ‘bowl’ as a serving vessel gained popularity with the rise of Instagram food culture, making it a visual feast.
This dish echoes the global shift toward plant-based, flexible meals that prioritize nutrition and ease.
Deep dive into key ingredients
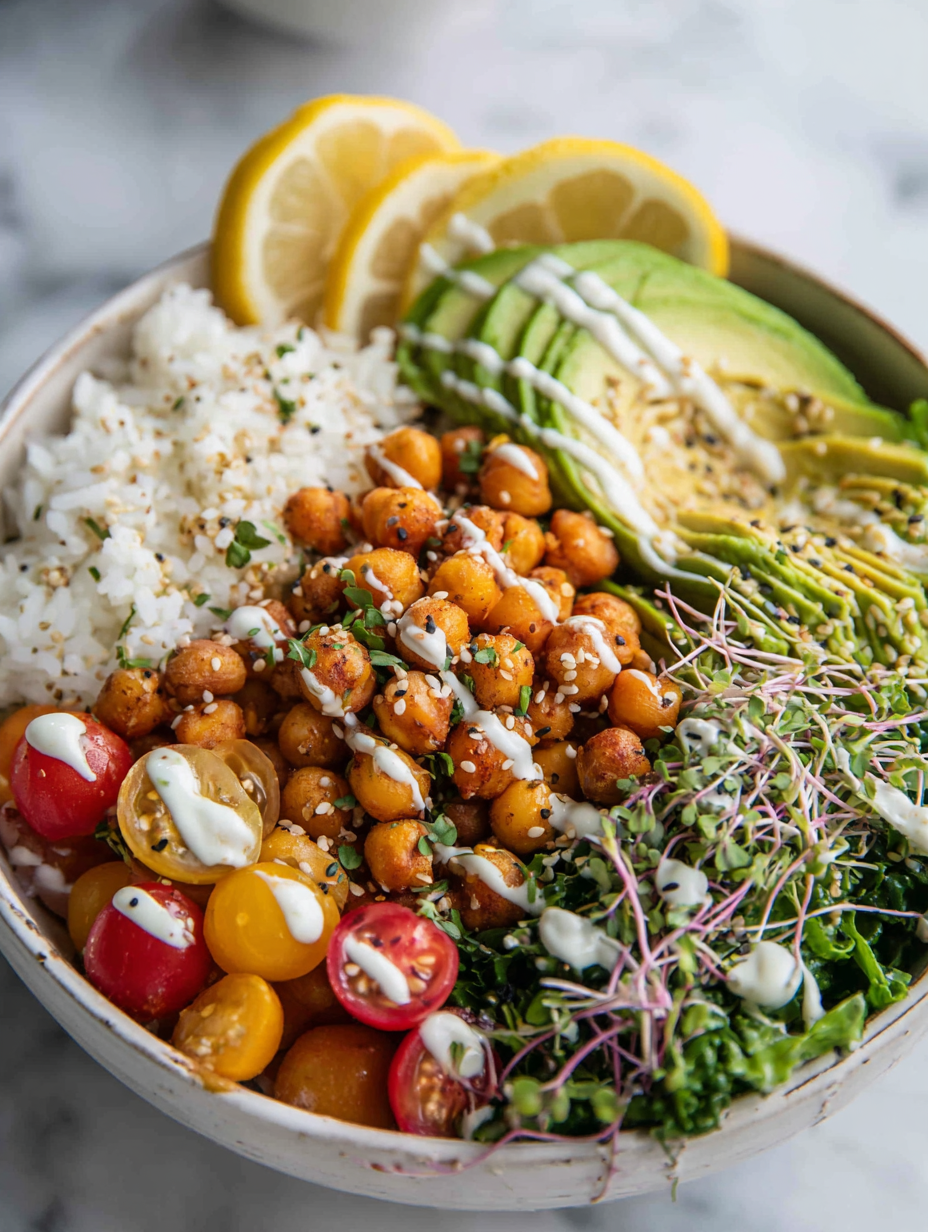
- Chickpeas: First I roast them until crispy, then sprinkle with smoked paprika. Swap with roasted lentils for a different crunch.
- Quinoa: Cook until fluffy, about 15 minutes. You can substitute brown rice or millet, adjusting cooking times.
- Avocado: Ripe and creamy, adds richness. Replace with cucumber for brightness and crunch.
- Radishes: Peppery bite, slices add crunch. Turn to shredded carrots if radishes aren’t available.
- Tahini: Nutty, smooth, ties everything together. Use Greek yogurt for a tangy alternative.
Spotlight on chickpeas and greens
Chickpeas
- Chickpeas: They’re hearty, nutty, and have a firm bite when roasted. They hold up well with any seasoning.
- Greens: Leafy, tender, with a slightly bitter edge that balances the richness of chickpeas. They wilt slightly when dressed.
Chickpeas
- Chickpeas: Their oozing, slightly smoky flavor makes every bite satisfyingly savory.
- Chickpeas: They absorb spices well, becoming more flavorful after roasting or sautéing.
Substitutions to tailor your bowl
- Grains: Swap quinoa for brown rice or millet for different textures but keep the heartiness.
- Greens: Use kale or spinach if arugula isn’t your thing. Slightly wilt kale for softer texture.
- Dressing: Replace tahini with sunflower seed butter for nut allergies, with a similar creamy finish.
- Chickpeas: Use roasted lentils for a different crunch and a slightly earthier flavor.
- Toppings: Add roasted sweet potatoes or pickled vegetables for extra warmth or acidity.
Step-by-step guide to assembling your Chickpea Buddha Bowl
Equipment & Tools
- Oven: Roast chickpeas for crunch.
- Saucepan: Cook quinoa.
- Baking sheet: Hold chickpeas during roasting.
- Whisk: Mix dressing.
- Bowls: Assemble and serve.
Step 1: Preheat your oven to 200°C (392°F).
Step 2: Drain and rinse the chickpeas, then dry thoroughly using a towel.
Step 3: Toss chickpeas with olive oil, smoked paprika, salt, and pepper. Spread on a baking sheet.
Step 4: Roast for 25-30 minutes until crispy and golden, shaking halfway through.
Step 5: While chickpeas roast, cook 1 cup of quinoa in 2 cups of water, simmer 15 minutes until fluffy.
Step 6: Wash and chop greens—spinach, kale, arugula—set aside.
Step 7: Prepare your dressing: whisk lemon juice, tahini, garlic, and a splash of water until smooth.
Step 8: Assemble the bowls: start with grains, add greens, chickpeas, and toppings like avocado, radish, or seeds.
Step 9: Drizzle with dressing and serve immediately.
Let the assembled bowls sit for 2-3 minutes to meld flavors before eating.
How to Know It’s Done
- Chickpeas are crispy and golden, not soggy.
- Quinoa is tender and fluffy, with no water remaining.
- Greens are fresh, not wilted or slimy.
Tips and tricks for a perfect Buddha bowl
ROAST chickpeas on a single layer for even crispiness.
TOAST seeds separately for a nutty aroma.
USE lemon juice for brightening—wait to add until just before serving.
TOSS greens with dressing just before plating to keep them crisp.
DON’T overcook grains—aim for tender but still chewy, not mushy.
CRACK the chickpeas out of the shell for extra crunch and flavor.
PREHEAT your plates slightly for a warm contrast to the cool ingredients.
Common pitfalls and how to fix them
- FORGOT to dry chickpeas thoroughly → They won’t crisp up. Pat dry with a towel before roasting.
- DUMPED too much dressing → Balances better with less, start small and add as needed.
- OVER-TORCHED chickpeas → Lower oven temp to 180°C (356°F) and check at 20 min.
- SCOURED greens → Rinse again or swap with sturdier kale or spinach for a fresher bite.
Quick fixes for common problems
When chickpeas are soft, turn up oven to re-crisp for 5 mins.
Splash vinegar in greens if they turn slimy.
Patch over under-seasoned dressing with a squeeze of lemon or a dash of salt.
Shield delicate toppings with a dollop of hummus or extra dressing.
When in doubt, add a pinch of chili flakes for heat and flavor.
Prepping and storing your Buddha bowl components
Chickpeas can be roasted up to 3 days ahead; store in an airtight container.
Cooked grains stay fresh in the fridge for about 4 days, perfect for prepping in advance.
Chopped greens can be kept in a damp towel in the fridge for 1-2 days.
Dressed bowls are best enjoyed fresh, but the components can be assembled ahead and dressed just before eating.
Why this Buddha bowl matters to me
What makes this Buddha bowl different? It’s all about how I layer flavors—sweet, smoky, tangy—and keep it honest.
Can I prep this in advance? Yes, chop and roast ingredients a day ahead, keep separate, and assemble just before eating.
What’s the best way to cook the chickpeas? Roast or sauté for crunch—avoid boiling if you want that chewy bite.
How do I keep the greens fresh? Store washed and wrapped tightly in a damp towel in the fridge, use within 2 days.
Can I replace quinoa? Sure, brown rice or farro work, but they change the texture and cooking time.
What’s a good dressing I can use? A simple tahini, lemon, garlic mix keeps it light and bright.
How do I avoid soggy veggies? Roast or sauté separately and add just before serving.
Is this bowl filling? Absolutely, the chickpeas and grains pack enough protein and fiber.
Can I make it vegan? Totally—just skip any honey or dairy in dressings; use maple syrup instead.
Any tips for picky eaters? Keep the flavors simple; maybe just chickpeas, greens, and a mild dressing.
Chickpea Buddha Bowl
Ingredients
Equipment
Method
- Preheat your oven to 200°C (392°F). In a bowl, toss the drained chickpeas with 1 tablespoon of olive oil, smoked paprika, salt, and pepper. Spread them evenly on a baking sheet.
- Roast the chickpeas in the oven for 25-30 minutes, shaking the pan halfway through, until they are golden and crispy. Set aside to cool slightly.
- Meanwhile, rinse the quinoa under cold water. Combine quinoa and water in a saucepan and bring to a boil. Reduce heat to low, cover, and simmer for about 15 minutes until tender and fluffy. Fluff with a fork and set aside.
- Prepare the tahini dressing by whisking together tahini, lemon juice, minced garlic, and a splash of water until smooth and creamy. Season with salt and pepper to taste.
- Wash and thinly slice the radishes. Slice the ripe avocado into thin pieces. Prepare your greens by washing and tearing them into bite-sized pieces.
- Assemble the bowls by starting with a base of fluffy quinoa. Top with greens, then arrange crispy chickpeas, radishes, and avocado slices on top.
- Drizzle the tahini dressing generously over the assembled bowls, allowing it to seep into the layers for added flavor.
- Serve immediately, enjoying the contrast of textures and vibrant colors. Alternatively, refrigerate components separately and assemble just before serving for freshness.
Notes
Whenever I feel that midweek slump, a colorful bowl like this reminds me to slow down and enjoy the simple pleasures of good, honest food.

Founded by Rachel Morgan, a proud home cook and foodie from Austin, Texas, this blog is all about transforming everyday meals into moments of joy.