In the mornings, I need something that feels like a hug but is quick enough to eat on the go. These peanut butter muffins started as a desperate grab-bag recipe, but now they’re my little ritual. The smell of toasted peanut butter and warm batter fills the kitchen, softening the chaos outside the door.
They’re not fancy, just honest, simple ingredients turned into a familiar comfort. Baking them reminds me that sometimes, the right bite can turn a bad day around. Plus, they’re crazy easy, which is essential on busy mornings.
A personal take on how these muffins are my unexpected comfort during hectic mornings, turning chaos into cozy sweetness.
Why These Muffins Matter to Me
- Baking these feels like a warm hug on a rushed morning.
- I love the smell of peanut butter toasting, it’s oddly nostalgic.
- Sometimes I add a pinch of cinnamon just to shake things up.
- Sharing these muffins always sparks a little joy around the table.
- They remind me that simple ingredients can create comfort without fuss.
My Unexpected Morning Rescue
- I first made these when I was trying to use up a jar of peanut butter that was lurking in the back of the pantry.
- They turned out better than I expected — moist, flavorful, and just sweet enough.
- Now, they’re part of my quick comfort food rotation, especially when mornings feel chaotic.
Quick Trivia and Origins of Peanut Butter Muffins
Peanut butter muffins trace their roots to classic American quick breads, but the addition of peanut butter gives them a nutty twist.
They’re a favorite in lunchboxes, especially in the South, where peanut butter is woven into daily life.
This recipe adapts a simple muffin base, adding a protein punch and richer flavor with peanut butter.
In some regions, these muffins are slightly sweetened with honey or molasses for extra depth.
Peanut butter’s natural oils help keep these muffins moist and tender, a trick bakers love for quick treats.
Ingredient Insights and Swaps
- Peanut butter: I prefer creamy for smooth muffins, but chunky adds texture—try almond butter for a nutty twist.
- Flour: All-purpose works best; whole wheat adds density but keeps flavor hearty.
- Sugar: Regular granulated gives a nice sweetness—swap with honey for richer flavor.
- Egg: Binds everything together and adds moisture—use a flaxseed egg for vegan version.
- Milk: Any kind works, but dairy milk gives a creamier crumb—coconut milk adds a subtle tropical note.
Spotlight on Peanut Butter and Baking Powder
Baking Powder: The leavening agent that helps muffins rise—without it, they’d be dense bricks.
- Peanut butter: It’s the star—its oily richness keeps muffins moist and adds a deep, roasted flavor.
- Bulky and sticky, it helps create that satisfying nutty bite with each mouthful.
- During baking, it melts into the batter, making each muffin dense and gooey.
Baking Soda: Optional, but helpful if using natural peanut butter, which is less acidic.
- It reacts quickly, so once mixed, bake promptly to maximize lift.
- A little goes a long way—just 1 teaspoon is enough for fluffy texture.
- Always check freshness—old baking powder won’t give the same rise.
Substitutions for Different Diets and Flavors
- Dairy-Free: Use almond or coconut milk—adds a subtle nutty or tropical note.
- Gluten-Free: Swap with a gluten-free flour blend—may need a touch more liquid.
- Sweetener: Maple syrup or honey can replace sugar—adjust quantity for sweetness.
- Nut Butter: Almond or cashew butter—different flavor, but similar texture.
- Eggs: Flaxseed or chia eggs—great for vegan options, slightly denser crumb.
How to Make Peanut Butter Muffins – Step-by-Step Guide
Equipment & Tools
- Muffin tin: Holds the batter as it bakes.
- Mixing bowls: Combine ingredients separately before mixing.
- Whisk or spoon: Mix ingredients smoothly.
- Paper liners or greasing tools: Prevent sticking and easy removal.
- Cooling rack: Allow muffins to cool evenly and avoid sogginess.
Step 1: Preheat oven to 180°C (350°F). Line a muffin tin with paper liners or grease it well.
Step 2: In a large bowl, whisk together 1 cup flour, ½ cup sugar, 1 tsp baking powder, and a pinch of salt.
Step 3: In another bowl, mix ½ cup peanut butter, 1 large egg, ½ cup milk, and ¼ cup melted butter until smooth.
Step 4: Pour the wet ingredients into the dry, folding gently until just combined. Avoid overmixing.
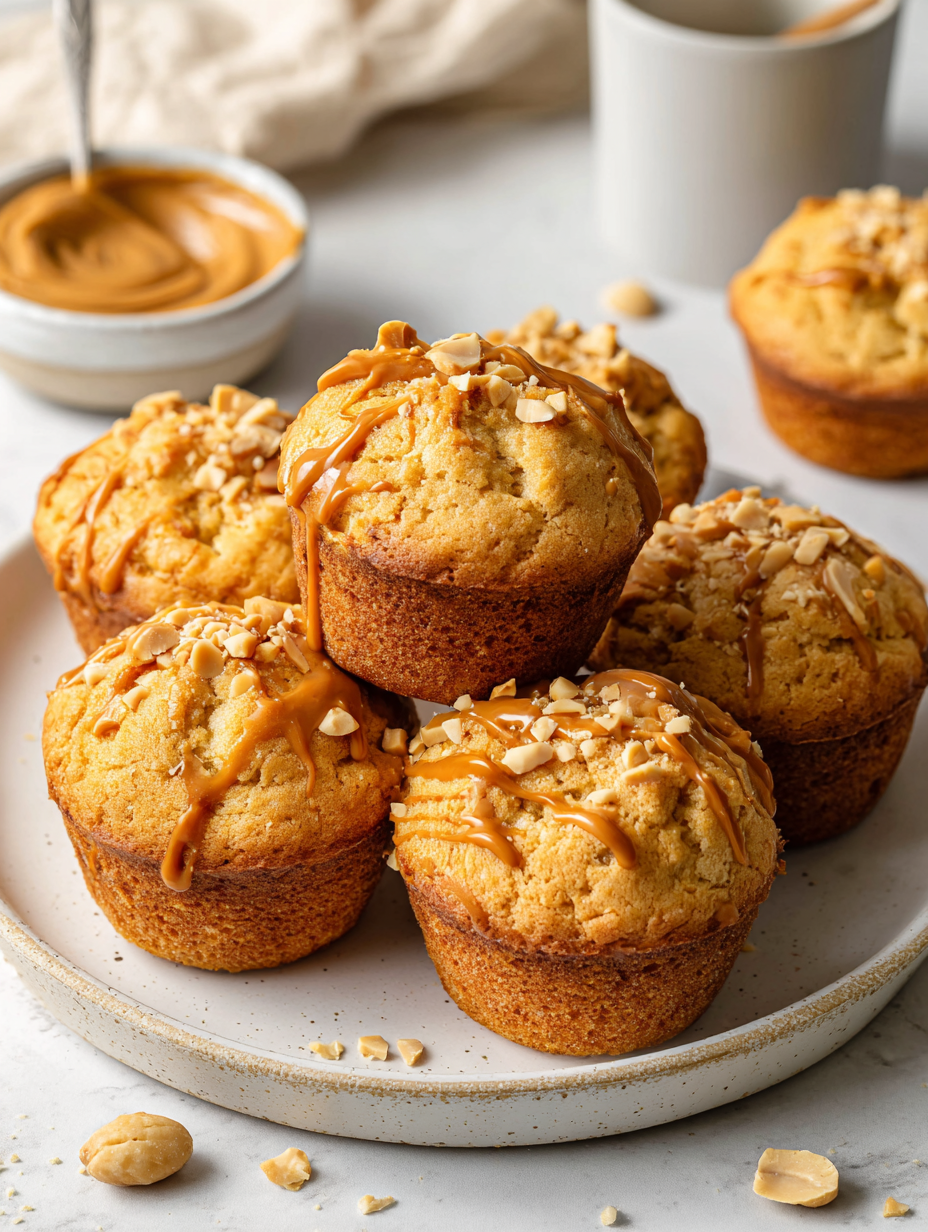
Step 5: Divide batter evenly among muffin cups, filling about ¾ full. Sprinkle a little extra sugar or chopped peanuts on top if desired.
Step 6: Bake for 15–18 minutes. The tops should turn golden and a toothpick inserted comes out clean.
Step 7: Check for doneness: the muffins should feel firm, and the tops should crack slightly.
Step 8: Remove from oven and let cool in the tin for 5 minutes, then transfer to a wire rack to cool completely.
Step 9: Rest for at least 10 minutes before eating; this helps set the crumb and enhances flavor.
Step 10: Serve warm or at room temperature. These muffins are best enjoyed within 2 days, or freeze for longer storage.
Let muffins rest for 10 minutes on a wire rack. Serve warm or at room temperature, perhaps with a smear of butter or extra peanut butter.
How to Know It’s Done
- Golden top and a slightly cracked surface.
- Toothpick inserted in the center comes out clean.
- Muffins feel firm but spring back when pressed lightly.
Cooking Tips & Tricks for Perfect Muffins
Use room temperature eggs—easier to mix and helps the batter come together smoothly.
Gently fold wet into dry—overmixing makes muffins dense.
Toast the peanut butter slightly before mixing—brings out its rich, roasted aroma.
Fill muffin cups only ¾—avoids overflow and helps muffins rise evenly.
Add a pinch of baking soda if using natural peanut butter—helps with rise.
Common Mistakes & How to Fix Them
- FORGOT to preheat the oven? Turn it on now, and bake at 180°C (350°F) for 2–3 minutes to warm.
- DUMPED too much batter in the cups? Fill only ¾ full to avoid spilling over.
- OVER-TORCHED the tops? Cover them loosely with foil and lower oven temp by 10°C (20°F).
- UNDERBAKED muffins? Extend baking time by 2–3 minutes until golden and a toothpick tests clean.
Fast Fixes for Muffin Mishaps
When batter is too thick, splash in a tablespoon of milk to loosen it.
If muffins are flat, patch with a sprinkle of baking powder on top and bake 2 extra minutes.
Shield muffins with foil if tops brown too quickly.
Splash a little extra peanut butter on top before baking for a glossy finish.
If batter is lumpy, gently fold in a tablespoon of warm water to smooth it out.
Make-Ahead & Storage Tips
You can bake these muffins a day ahead; store in an airtight container at room temperature.
For longer storage, freeze baked muffins wrapped tightly—best within 1 month.
Reheat in the microwave for 15–20 seconds; they stay soft and warm with a nutty aroma.
Adding a fresh smear of peanut butter or a drizzle of honey after reheating boosts flavor.
Practical Questions About Peanut Butter Muffins
Can I use natural peanut butter instead of creamy? Yes, natural peanut butter works fine, but expect a slightly oilier batter.
How do I know when the muffins are done? They should be golden on top and a toothpick inserted comes out clean.
Can I add chocolate chips? Absolutely, fold in ½ cup for extra melty, sweet bites.
Is gluten-free possible? Yes, substitute all-purpose flour with a gluten-free blend, but watch the batter’s consistency.
How long do these muffins stay fresh? Store in an airtight container for 2 days at room temp or freeze for longer.
Can I make these ahead? Bake, cool, then refrigerate for up to 2 days or freeze for a month.
What’s a good dairy-free option? Use almond or coconut milk instead of regular milk, and skip butter.
Are these muffins kid-friendly? Yes, sweet, nutty, and portable—perfect for little hands.
Can I replace sugar with honey? Yes, reduce liquid slightly; honey adds moisture and a richer flavor.
What if I don’t have muffin tins? Use a small loaf pan for a different shape, just adjust baking time.
Peanut Butter Muffins
Ingredients
Equipment
Method
- Preheat your oven to 180°C (350°F) and line a muffin tin with paper liners or lightly grease it.
- In a large mixing bowl, whisk together the flour, sugar, baking powder, and salt until evenly combined. This creates a light, airy dry base for your muffins.
- In a separate bowl, combine the creamy peanut butter, egg, milk, and melted butter. Whisk until the mixture is smooth and slightly frothy, releasing a warm peanut aroma.
- Pour the wet mixture into the dry ingredients, then gently fold them together with a spoon or whisk just until no dry flour remains. Be careful not to overmix—this keeps the muffins tender.
- Divide the batter evenly among the muffin cups, filling each about three-quarters full. You might see some swirls of peanut butter and streaks of batter—this is perfect.
- Bake the muffins in the preheated oven for about 15–18 minutes. The tops will turn a beautiful golden brown, and you'll notice a slight crack on each as they rise and set.
- Remove the muffins from the oven and let them cool in the tin for 5 minutes. Then transfer them to a wire rack to cool completely—this prevents sogginess and lets the aroma fully develop.
- Once cooled, enjoy the muffins warm or at room temperature. They’re perfect on their own or with a smear of extra peanut butter for an extra indulgence.
Notes
Sometimes, I toss in a handful of chocolate chips or a dash of cinnamon—whatever feels right. They’re a reminder that good things don’t have to be complicated, just honest and a little bit indulgent.

Founded by Rachel Morgan, a proud home cook and foodie from Austin, Texas, this blog is all about transforming everyday meals into moments of joy.