
One evening, the lights flickered out just as I was about to finish baking. Instead of reaching for the microwave or the oven, I grabbed a jar of peanut butter and some graham crackers. That quiet, unplanned moment turned into a surprisingly satisfying treat, no baking required.
There’s something about the simplicity—peanut butter, chocolate, a quick press into a pan—that feels like a small rebellion against the chaos of the day. We’re so used to relying on heat and gadgets, but sometimes, just a few pantry staples can turn into comfort food, no oven needed.
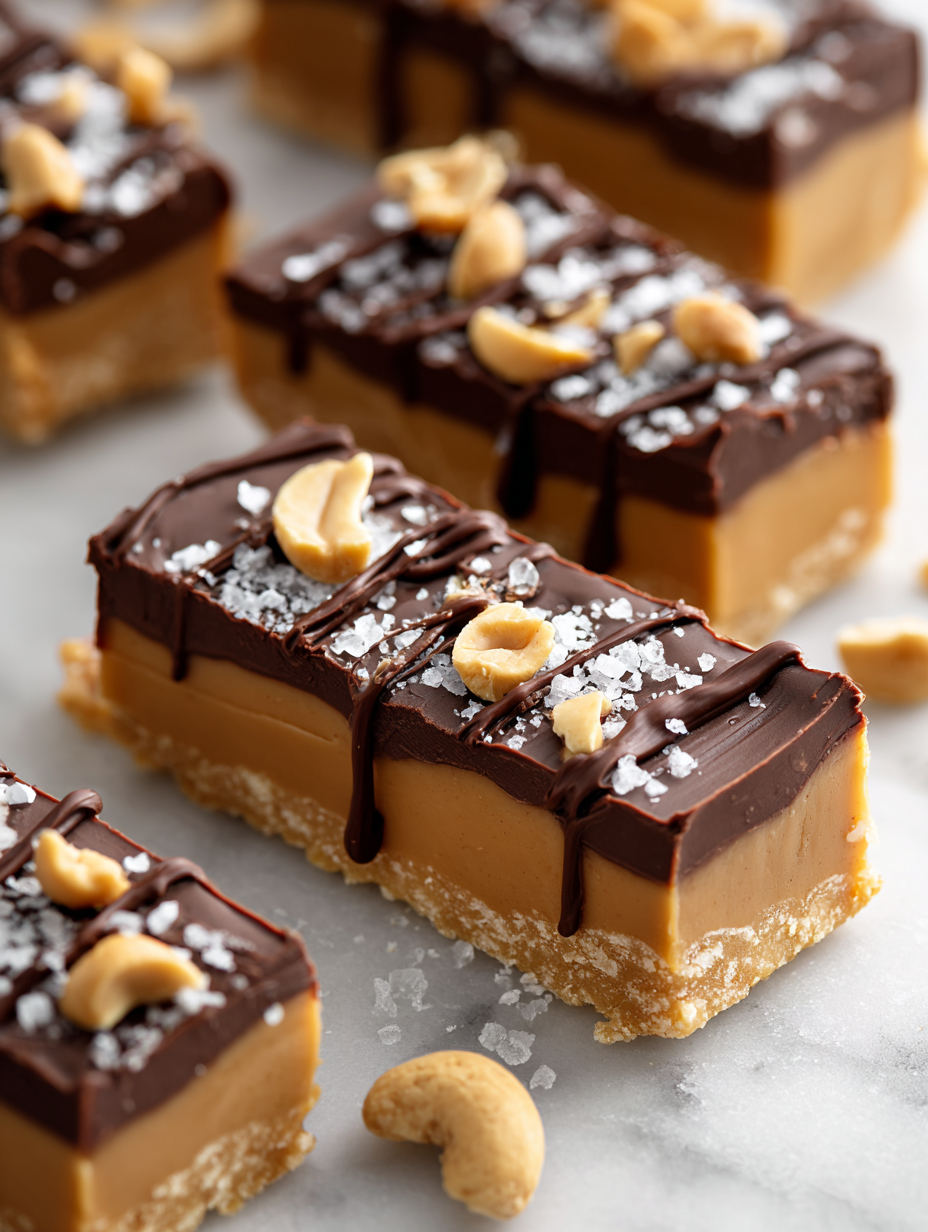
The Unlikely Art of Making No-Bake Peanut Butter Bars During a Power Outage
Why These Bars Matter to Me
- I love how these bars come together in minutes, perfect for impulsive sweet cravings.
- Making them without an oven feels rebellious, like a small kitchen victory.
- The smell of melting chocolate and peanut butter is pure comfort.
- Sharing these bars always sparks a little joy, they’re oddly nostalgic.
- They remind me that simple ingredients can create something really satisfying.
The Spark That Started It All
- One rainy afternoon, I found a jar of peanut butter and a handful of chocolate chips. No oven, no fuss, just a quick fix for a sweet craving. That moment of improvisation turned into a beloved recipe I keep coming back to.
- It’s a reminder that sometimes, the best treats are made with what’s already in the pantry. No fancy ingredients, just honest, familiar flavors.
- This recipe has been a lifesaver during power outages, busy weeknights, and spontaneous gatherings.
A Brief History of No-Bake Peanut Butter Treats
The concept of no-bake bars dates back to post-war resourcefulness, using pantry staples.
Peanut butter became popular in America during the 1900s, especially in wartime recipes.
Graham crackers were originally developed as a health food in the 19th century.
Chocolate-topped peanut butter treats are a classic combo, dating back to the early 20th century.
Many similar recipes exist across cultures, often using local nuts and sweeteners.
Ingredient Insights & Tweaks
- Peanut Butter: I prefer creamy, roasted peanut butter that’s rich and slightly salty. Swap with almond butter for a different nutty note, but expect a different aroma.
- Chocolate Chips: Use semi-sweet for balanced sweetness. Dark chocolate adds depth; milk chocolate is sweeter and creamier.
- Graham Crackers: They give the base a sweet, toasty flavor. Digestive biscuits are a good substitute, with a slightly crunchier bite.
- Butter: Adds richness and helps bind. Use coconut oil for a dairy-free version that melts smoothly.
- Honey or Maple Syrup: Sweeten naturally with these. Maple gives a slightly smoky flavor, honey is more floral.
Spotlight on Peanut Butter and Chocolate
Peanut Butter
- The aroma of roasted peanuts fills the room when opening a jar. It’s a warm, inviting smell.
- The mixture becomes oozy and shiny as the chocolate melts, inviting you to sneak a taste.
- Peanut butter’s texture influences the final bars—creamy vs. chunky makes a big difference.
Chocolate Chips
- Chocolate chips soften and shimmer when melted, giving the topping its glossy, tempting look.
- They crackle slightly when stirred, releasing a faint chocolate aroma.
- The key is to melt slowly to avoid burning or seizing.
Smart Substitutions for Different Diets & Tastes
- Dairy-Free: Swap butter for coconut oil for a subtle coconut aroma and slightly softer texture.
- Sweetener: Use agave syrup or brown rice syrup instead of honey for a different sweetness profile.
- Chocolate: Replace chocolate chips with chopped dark chocolate or vegan chocolate for variety.
- Crackers: Gluten-free graham crackers or rice cereal can be used for allergy-friendly options.
- Nut Butter: Almond or cashew butter can be substitutes, slightly altering flavor and texture.
Step-by-Step Guide to No-Bake Peanut Butter Bars
Equipment & Tools
- 20cm (8-inch) square pan: To hold and set the bars.
- Microwave-safe bowls: For melting butter, peanut butter, and chocolate.
- Spatula: To spread and mix ingredients.
- Parchment paper: To line the pan for easy removal.
- Knife or pizza cutter: To cut the bars.
Step 1: Line a 20cm (8-inch) square pan with parchment paper. Gather all ingredients.
Step 2: In a microwave-safe bowl, melt 1 cup (250g) of butter and 1 cup (250g) of peanut butter together. Heat in 30-second bursts, stirring each time, until smooth.
Step 3: Add 1/2 cup (100g) of honey or maple syrup to the melted mixture. Mix well.
Step 4: Crumble 2 cups (200g) of graham crackers into the mixture. Stir until evenly coated and crumbly.
Step 5: Press the mixture evenly into the prepared pan. Use the back of a spoon or a spatula to smooth it out.
Step 6: Melt 1 cup (180g) of chocolate chips in the microwave in 20-second bursts, stirring each time, until smooth.
Step 7: Pour the melted chocolate over the peanut butter layer. Use a spatula to spread it evenly.
Step 8: Chill in the fridge for at least 2 hours, until firm. For best results, leave overnight.
Step 9: Once set, lift the bars out of the pan using the parchment paper. Cut into squares.
Step 10: Serve chilled or at room temperature, with a glass of milk or a cup of coffee.
Chill for at least 2 hours or overnight. Keep covered, then cut into squares for serving.
How to Know It’s Done
- Chocolate is shiny and smooth.
- Bars are firm when gently pressed.
- Crust looks evenly packed and no cracks appear.
Top Tips & Tricks for Perfect Bars
TEXTURE: Use room temperature peanut butter for a smoother mixture.
FLAVOR: Toast the graham crackers lightly for a nuttier taste.
TECHNIQUE: Melt chocolate slowly to prevent burning and maintain shine.
CONSISTENCY: Press mixture firmly into the pan to avoid crumbling.
TEXTURE: Chill until the chocolate is just set but not hard, for easier cutting.
Common Mistakes and How to Fix Them
- FORGOT TO LINE THE PAN? Use parchment paper for easy removal.
- DUMPED TOO MUCH CHOCOLATE? Use a spatula to spread evenly, then chill to set.
- OVER-TORCHED CHOCOLATE? Start melting at lower power and stir frequently.
- NOT ENOUGH CHILLING? Extend fridge time to 3 hours for a firmer set.
Quick Fixes for Common Issues
When chocolate is dull, re-melt briefly and stir to regain shine.
Splash a bit of coconut oil into melted chocolate for a glossy finish.
Patch a cracked bar with a little melted chocolate to mend it.
Shield the bars from moisture by wrapping tightly, especially in humidity.
When in doubt, re-chill the bars if they’re too soft or sticky.
Make-Ahead & Storage Tips
Prepare the bars up to 24 hours in advance. Wrap tightly and store in the fridge.
They keep well for up to a week in an airtight container in the fridge.
The flavors deepen slightly overnight, making them even more delicious.
Reheat slightly in the microwave for 10 seconds if you prefer softer bars; smell the rich chocolate and peanut butter.
Practical Q&As for Perfect No-Bake Peanut Butter Bars
Can I use natural peanut butter? Yes, but expect a slightly oilier, less creamy texture.
What if I don’t have graham crackers? Substitute with digestive biscuits or even crushed pretzels.
Can I make these bars vegan? Use plant-based butter and vegan chocolate, no loss in flavor.
How long do they keep? Up to a week in the fridge, wrapped tightly.
Can I freeze these? Absolutely. Wrap well and freeze for up to a month.
Is there a way to make them healthier? Swap some sugar for honey or maple syrup.
Can I add other ingredients? Nuts, dried fruit, or a sprinkle of sea salt on top work well.
How do I get a firm set? Chill for at least 2 hours, preferably overnight.
What’s the best peanut butter? Creamy, natural peanut butter with a rich, roasted aroma.
Can I use chocolate chips instead of melted chocolate? Yes, sprinkle on top and press in slightly before chilling.
No-Bake Peanut Butter Bars
Ingredients
Equipment
Method
- Line your square pan with parchment paper, leaving some overhang for easy removal, and set aside.
- Place the butter and peanut butter in a microwave-safe bowl and microwave in 30-second bursts, stirring each time, until the mixture is smooth and shiny.
- Add the honey or maple syrup to the melted mixture and stir until well combined, creating a sweet, fragrant syrup.
- Crumble the graham crackers into small pieces and fold them into the wet mixture until evenly coated and crumbly but sticky enough to hold together.
- Press this mixture firmly and evenly into the prepared pan using the back of a spatula or your fingers; this helps create a compact, even base.
- In a separate microwave-safe bowl, melt the chocolate chips in 20-second bursts, stirring well each time until smooth and glossy.
- Pour the melted chocolate over the pressed layer, spreading it out evenly with a spatula for a glossy, uniform top.
- Place the pan in the fridge and chill for at least 2 hours, or until the chocolate is set and the bars are firm.
- Once chilled, lift the bars out of the pan using the parchment overhang and cut into squares with a sharp knife or pizza cutter.
- Serve the bars chilled or at room temperature, enjoying the rich, nutty flavor and chewy texture.
Notes
In a world full of complicated recipes, these bars are a little reminder that good food doesn’t have to be fancy or time-consuming. Just a few honest ingredients and a bit of patience, and you’ve got a sweet, nutty treat that’s perfect for sharing—or not.

Founded by Rachel Morgan, a proud home cook and foodie from Austin, Texas, this blog is all about transforming everyday meals into moments of joy.